Author: Mitzi

  • Weekend Project: Bleaching Furniture

    Weekend Project: Bleaching Furniture

    Refreshing our home has been a mission of mine since we locked down in March 2020. Over the last 18 months, Josh and I have refreshed our home and are digging it out of it’s early 00’s rut! At this point of our refresh, neither one of us is shocked to walk into a full blown project. (Selecting Paint Colors, Powder Bath, Dining room decor, and Guest Bath projects linked here!)

    Josh will tell you that I am the queen of online garage sale pages and resale stores. I love the thrill of taking something old and solid, and turning it into a custom piece for our space! When I picked this table for $80, I saw potential. I was also 8.5 months pregnant and preparing to move into our current home. As soon as we were mostily unpacked, Josh re-stained the table for me using my favorite stain (Java by General Finishes). While I loved it, we also picked up these black chairs (fo-free!) from a neighbor, and we needed to pivot and find a way to update the table so that the chairs stood out!

    Our Before

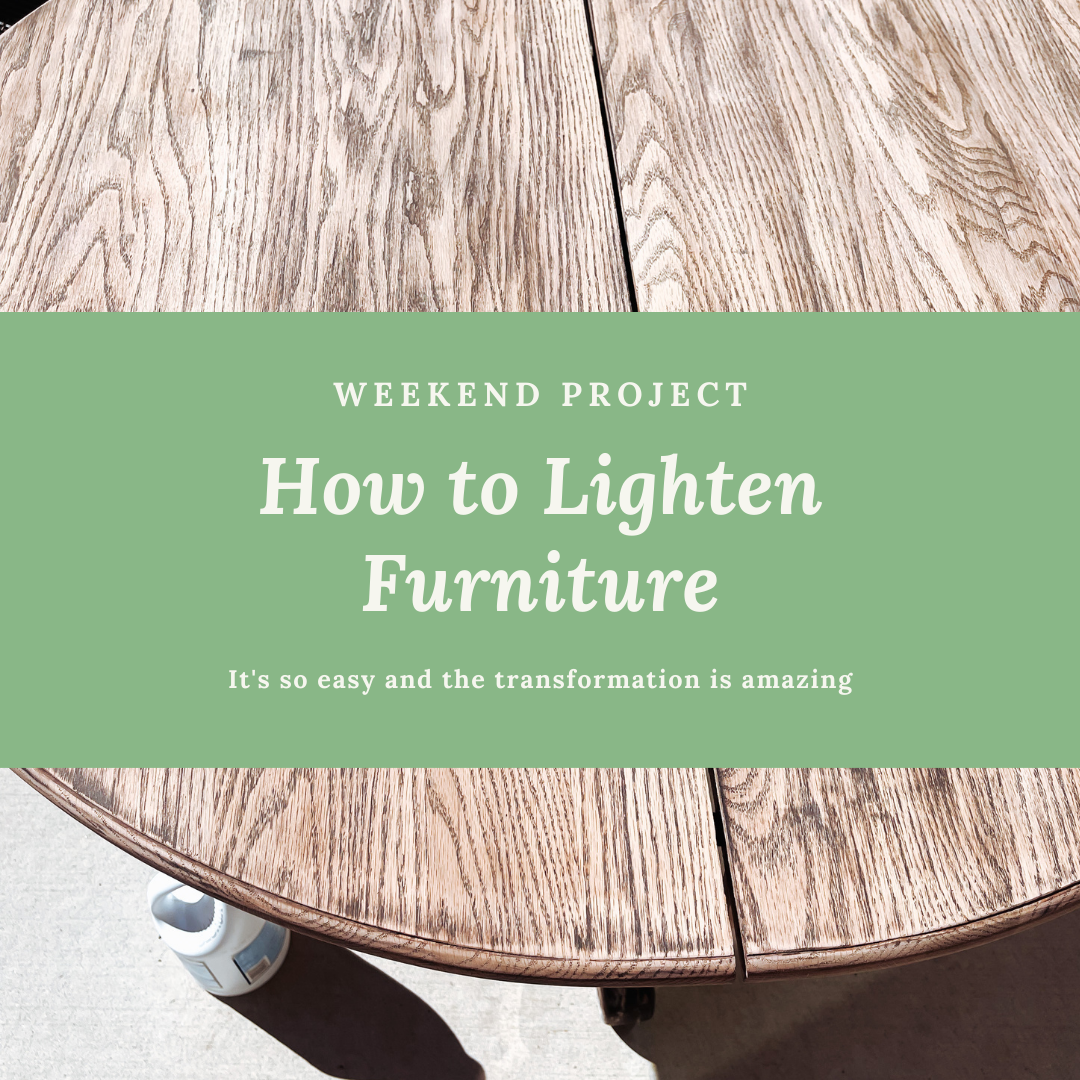
    I knew paint was not an option, I’m so over the chalk painted trend. While this paint has a purpose in other places in my home, it just wasn’t an option as I am going for a more transitional style in our main living space. After a trusty Pinterest and Google search, I knew I wanted to strip the table and bleach it for a more modern feel!

    So I did what I do best, I started my project when Josh was at work! I started off by stripping off the old top coat and as much stain as I could. I knew it would be a feat considering that I was going from dark to light! After removing as much of it as I could, I broke out our mouse sander and got to sanding (we used 400 & 220 grit)! A mouse sander will help you to get in all of the nooks and crannies to sand down to the natural wood.

    Now here is the fun part! Make sure you are wearing old clothes because you will be working with bleach! Take a natural bristle brush and a cup of bleach and paint it onto the wood in a consistent motion and avoid drips. You can do this process in a well ventilated area, but if its sunny out, you are going to want to work in the sun because it helps to lighten it faster! I applied 6 coats of bleach to get this effect. The bleach will pull the old stain to the surface and out of the wood. As you can see, we still had a lot of dark stain in the grain of the wood, but I decided to embrace those imperfections as they would compliment our chairs.

    During the bleach process

    **There are 2 part furniture bleaching kits out there (linked below), and I believe that they may be a tad more effective, but with the delays of 2021, they were over priced or sold out at the time of this project. (I already have another piece in mind for a DIY when I can locate one of these kits at a good price)!

    Lastly, we decided to seal our table with a non yellowing polyurythane. I wanted this table to maintain it’s bleached coloring and not turn yellow after my hard work. We decided to go with Minwax Polycrylic and applied with a foam brush.

    We love how this space turned out. It cost us a whopping $20 as we already had most of the materials and tools on hand! And with the money that we saved, we added a rug and a new fixture and STILL saved a ton of money! I’ve linked everything (except the clorox) below! Let me know what you think!

    -Mitzi (and Josh)

  • Cajun Favorites

    Cajun Favorites

    ** This blog post contains Affiliate links. By clicking and shopping, you are helping me to keep my blog running and allowing me to continue doing what I love!

    If I’m being honest, this post is way past due! One of my most asked questions is “Mitzi, where did you get your big pots… what does Josh use to cook his gumbo in?” For the longest, I didnt have an answer. I inherited my grandmother’s aluminum Magnalite pots and we recieved a few for our wedding, but the company is no longer. You could go to many places in South Louisiana and purchase Cajun Ware, but they weren’t online for my out of town friends to purchase.

    That is until I found these options that I have linked in my Amazon Storefront! I love my aluminum cookware. Its sturdy and can be passed from generation to generation, I have my grandmothers and it’s still going strong. Now, I do have to say, they are not dishwasher friendly. They will turn and become dull if you run through the dishwasher and they will turn black if you boil straight water in them. I was always taught from an early age that those two things were big no-no’s with my “magnalites/cajun wares.”

    Now, after sharing my favorite Cajun cookware, it’s time to share Josh’s. He loves to cook in cast iron. We tracked down a big 18qt Dutch Oven from Don’s Specialty Meats in Scott, LA a few years ago and he uses that pot to cook everything! He also enjoys using it to cook on our outside burners during the fall/winter. I wish that I could have found an 18qt to link, but I could only find a 12qt and Cast Iron looks to be in limited supply right now. I will be on the lookout and update my storefront with inventory as it becomes available.

    Also linked are our FAVORITE cooking spoons! We use them daily. We love to have both the short cooking spoon and the longer spoons in our arsenal and these really are the best! Now, I know what you are going to tell me, “Jar roux, Mitzi, REALLY?!” Mais, yeah!! I can cook my own roux with the best of them, but there are times when you end up accidentially burning it, discover your flour is bad, or are in a rush and don’t have the extra time to devote to making a roux. Kary’s is our favorite to have on hand in a pinch. Honestly, some of our best Gumbo feedback has been from making it from a jarred roux! I’ve also linked my favorite cookbooks, Cajun power items, and a few other staples that are a must in our Cajun household!

    Click here to shop!

  • Updating your Dining Room Decor on a budget

    To be honest, I’ve never reallly LOVED my dining room. I love little bits and pieces of it, but there were certain spaces that I never found decor that looked right in my space. I thrifted my sideboard and although it has a ton of space to store my fine china, the top of it has always proved to be difficult to decorate given its odd size.

    My decor taste has changed in the last 5 years, and although I love my dining room furniture, I really wanted to give it a more transitional update. I wanted to do so as budget friendly as possible, and well frankly, the Target/Studio McGee collection never dissapoints.

    I started with the mirror to build the vignette and did a little happy dance when this artwork nexted perfectly in front of it. I flanked the other side with the beautiful brown glass vase and elevated it slightly with an old book, then filled it with dried wheat branches for dimension.

    Once I had my anchor pieces, it was time to accessorize. I loved the wooden chain and pumpkin. I actually had other ideas for these pieces, but they just nested perfectly here. Next, I fell in LOVE with this candle and match vessels from the Old Flame Candle Co. This was a splurge, but I love that I can send it back to be refilled and it becomes the candle that keeps on living.

    Candle and Vessel are from The Old Flame Candle Co.

    Of course, it wouldn’t be a dining room refresh without a little seasonal decor! When I was shopping at Target, I came across these pretty, rustic ceramic pumpkins. Josh lost my Halloween tote in the abyss that is our Christmas corner, so a festive fall tablescape it was! I paired it with some vases, both new and old, and some antique candle holders. I tossed in bunches of silk mums from the craft store and… voila! Even my wine fridge is warm and cozy with my peace plant in a warm toned basket. Can I just say how much I love that warm tones are back!

  • Guest Bath Facelift

    Guest Bath Facelift

    When we moved into our home, we loved the gray that the previous owners painted our entire home. It was warm and homey, and very Restoration like. However, it wasn’t long before we realized our ENTIRE home would need a fresh coat of paint. The paint finish that they used was reformulated and we could not touch up a single spot without being noticable. No bueno with a house full of boys. We put off this task for 4 long years before 2020 forced us in our home and boredom had us purchasing a ridiculous amount of paint.

    Last year was the year of 20′ ceilings and a powder bath refresh. This year we are tackling the bathrooms (and hopefully the boys bedrooms). I decided to give our guest bath a little makeover. It was a small enough space to step outside of the box and test out painting our cabinets.

    I set my budget at $250 and I was determined to come in under, and I did just that at $249.50! We started off by taking out the old, frosted light fixture and painting the walls with Benjamin Moore Swiss Coffee. This is my go-to color in rooms where we do not have a lot of moulding. Our moulding is Sherwin Williams Navajo White and can pull yellow in some lighting and we do not want to repaint it. It’s also a great shade to match our tan ceilings and our very brown tile.

    Once the walls were painted, we installed the new light fixture! I’m usually not a huge fan of modern fixtures, but this one is absolutely stunning and I fell in love with it so much, we are installing them in the boys Jack and Jill! Honestly, this was the biggest part of our budget and it was worth it!

    Last, and the most tedious were the cabinets. I painstakingly sanded, prepped and painted the cabinets. In hindsight, I wish that I would have documented the process, but it was A LOT, and I was ready to get it finished! We went with Benjamin Moore Deep Olive and I love it! It’s a great mid-tone green that pops in this small bath. This was the project that had us debating whether or not to paint all of our cabinetry in our home and I am sold. But not before we invest in a good paint gun to make the task easier!

    I kept my white monogrammed shower curtain (not pictured) and accessorized with this watercolor picture and topiary that I picked up from my local antique store’s clearance booth. The rug and candle are HomeGoods finds. Soap dispensers and basket were Target dollar bin finds, but I’m linking similar here! (towel, soap dispenser, basket, and candle)

  • Just a little update

    Just a little update

    Hi Friends!

    It’s been a while since my last blog post and I thought that I would write this post before I get back into my regularly scheduled blog posts. Its so funny how life throws your curveballs. Little did I know, the last blog post that when I wrote on how to help through loss, I would be starting another grief journey.

    I lost my dad this summer and it was gut wrenching. It was hard when I lost mom, really hard. But she had been battling cancer for over 7 years. When she passed, I lost my best friend. When I lost dad, I lost my daddy. The man who would drop everything at a moments notice to help in any way he could. The one who spoiled me, who made sure his baby girl always had a care package in the mail when she missed home. The man who would drop everything to come and visit the boys, who made all of the big games, holidays, and school functions. The daddy who told us we could always go home if we needed. The one who would always give Josh the biggest handshake at the end of our visits and tell him to take good care of me and the boys. And the one who would constantly remind Josh of my “extra (bougie)” ways and hassle me for it. “She’s been that way since she’s been a little girl, big boy. She’s not going to change.”

    One of my most treasured last photos with my dad & siblings

    There’s a weird process that you go through when you lose your last parent. I’ve been navigating it since July, and it’s been a process. There’s peace in knowing that he is with my mom. He had a hard time after we lost her and there is joy in knowing that they are together again. The finality of things, the list of things that need to be done in order to move on to the next stage of healing.

    It stinks that I had to put some parts of my content creation on the back burner. I literally felt like Dory and some days I would tell myself to “just keep swimming.” Some days I feel as if this season just keeps extending itself, but I have faith that eventually “this too shall pass.” I’m excited to get back to some normalcy and I have so much to share with you!

    So in the words of F. Scott Fitzgerald, “Life starts all over again when it gets crisp in Fall.” It feels so good to be back.

    xo-

    Mitzi

  • 4 Ways to Help a Loved One Through Grief and Loss

    4 Ways to Help a Loved One Through Grief and Loss

    Yesterday, I was supposed to meet one of my good friends for brunch. We ended up agreeing to take a raincheck on brunch because life happened. Only, I ended up having a conversation with a random lady who purchased some home décor from me via our neighborhood garage sale page.

    This sweet lady kept apologizing profusely about how she had been comforting her best friend who had just lost her husband from Covid. By the end of our conversation we were both in tears. It’s amazing how sometimes you get messages when you least expect. I knew when I went to bed last night, I was waking up today and writing this blog post.

    On behalf of someone who is currently 3 years into the roller coaster of grief, I thought I would share some tips for those wanting to be there for their spouse, partner or friend with grief. From the outside looking in, it may be hard to determine what you can do to help. However, the things listed below helped me get through some of my darkest days after losing mom to a long battle with cancer.

    1. Listen. Listen, for some reason, talking through my moms last days helped me to process it. I know that talking about the end of life can be a little awkward, but it was something that I needed to talk myself through and Josh and my friends being there to listen to me was what I needed. Hospice was an experience that I could not put into words as we were going through it but in order for me to fully process it I had to put it in words later. Plus, having a laugh about me looking my worst and mom waking up after we thought that she wouldn’t, telling me that I needed to “put on some makeup and lipstick” because I was looking hella rough still makes me laugh till this day.
    2. Food. After a week of going through the motions of mom passing and having to plan her service. Knowing I was the detail oriented child who she trusted to execute her fully planned funeral all the way down to her suit coordinating with the ribbon on her floral arrangement, I was exhausted. Josh had to get back to work and my kids were home for the summer. My friends all pooled together and gave me gift cards for meals even after I refused a meal train. They fed my family when I mentally could not. I could get through breakfast and lunch but supper was hard and I was exhausted on so many levels. We lived on food delivery for weeks.
    3. Show up. Just show up. I had friends who drove over 5 hours to be at my moms funeral. I cannot tell you how many times I would attempt to crawl into my house and my friends would bust through my door and tell me to get dressed because we were going to lunch or that they were staying and we were having a happy hour. We were going to laugh, or cry… but if I cried they were making me laugh right after.
    4. Losing a parent is a tough club to be in, but I can attest that we have comraderies. Its a club that nobody wants to be in but we always show up. We write cards, drop off small gifts on anniversaries to let you know that we remember and are thinking of you.

    I can tell you that I don’t remember much about the year I lost my mom. That was the one thing that I remember my father in law telling me after he lost his mom. I didn’t believe it until I lived it. I know I was in survival mode and as much as I tried to be present for my family, I was also on auto pilot. I was grieving, and helping my kids grieve. But I can tell you one thing, the 4 things mentioned above are the things that I remember about that year. I remember those who showed up when I didn’t want them to. I remember my husband getting home from work and helping me cook and clean because I was too exhausted to do it. I remember the check ins, the surprises on my door step, the barge ins because I needed the tough love, and laughs. I know nobody wants to talk about death and grief, but the fact is, its a part of life and life doesn’t get back to “normal” after loss. We have a new normal, we have to mourn and go through holidays and milestones with empty seats. We have to get used to not being able to pick up the phone to talk to our loved one. And most importantly, we have to learn to look for our heavenly signs. My mom said she would send me butterflies and let me tell you, she does. I always tell her “hi” and so do my kids. I embrace the collective “hey mama” and “hey mee mee” when we see our butterflies. I could talk forever on our “signs from heaven” but that is a blog post for another day.

    xoxo-

    Mitzi

  • Mama’s “Not so Traditional” Meatloaf

    Mama’s “Not so Traditional” Meatloaf

    I’m just going to go ahead and be REAL honest with ya’ll! My entire first 17 years of life, I thought meatloaf was made with a red gravy and served over rice! It wasn’t until Josh and I started dating, and his mama handed me a plate with a slice of “loaf” and a bottle of ketchup, did I realize that I had been eating this dish in a unique way for years. I don’t know how mama came up with this recipe, and I thought the recipe was lost after she passed; but after my oldest requested it and I broke down crying to my daddy that I didn’t know how to make it, did he tell me that my sister did! Over the last 3 years, my siblings and I have opened up a conversation about how to make mama’s “Mulligan Stew” (that’s a blog post for another day) and her “Meatloaf w/ red rice and gravy”

    Now if you are looking for a healthy dish, this ain’t it. I made it “skinny-ish” by eating over cauli-rice but I did have a little taste of it with regular rice and it brought tears to my eyes because it tasted just as mama made it! Now when I called my sister for the recipe, I thought my mama didn’t use seasoning packets. That was my mistake, she totally did! So without further adieu, here is the recipe!

    Disclaimer: Mama never made a little of anything. She was the typical Cajun woman who made enough to feed an army, and that’s exactly how I made it, too! I plan on freezing leftovers (if we have any, ha!)

    For the meatloaf:

    Preheat oven to 375

    • about 4 lbs. of ground chuck. I had about 3.9 lbs. and it was the perfect amount
    • 2 packets of McCormick Meatloaf seasoning.
    • 4 eggs
    • 1 Tbsp. Salt (to taste)
    • 1 Tbsp. pepper (to taste)
    • 1/2 cup of Italian bread crumbs
    • 1/4 to 1/2 can of Evaporated milk

    I hate to mix raw meat with my fingers, so I added everything to my stand mixer and blended until combined. Just be careful not to over mix. Next, you are going to want to set out some wax paper and lightly flour it. Turn the meat out on the flour and shape, lightly flour the rest of the loaf and then transfer to your pot. I am using my grandmothers large 15″ Magnalite roaster.

    Ok, now this is where I lost my photographer so I don’t have photos of the next steps. I’ll update this post the next time that I make it! Promise! But for now, just trust me!

    • 2 29oz cans of tomato sauce
    • 2 Tbsp. Italian seasoning
    • 8oz beef broth
    • 2 cups of water

    Add 1 can of tomato sauce to the pot and coat the top of the meatloaf with a little bit of the sauce; then place the pot in the oven for about 30 minutes or until slightly brown. Once slightly brown, remove the meatloaf and add another can of tomato sauce and rinse both cans out with the beef broth and then add to the pot. Cook covered for about 3 hours or until you stick a thermometer in and it reads 170 or “well done.” Over the course of the cooking time, you will want to move the meatloaf around to avoid sticking and add water to the sauce, maintaining a thin gravy-like consistency.

    **cooking tip: If your food is sticking to the bottom of your pot; take off heat and cover tightly with the lid. Let sit for about 5-10 minutes and the stuck food should “release”

    Serve over rice and ENJOY! Let me know if you make this and what you thought about it! This dish is a piece of my childhood, wrapped up in a big red bow!

    -Mitzi

  • Pura Plug Ins

    Pura Plug Ins

    How do I love thee? Let me count those ways! First off, let me preface by saying that I receive a small commission when you click on my link and use my code but the opinions are all my own!

    I was talking to my mentor who has become one of my dearest friends and she was talking about how she saw somewhere that Pura was one of top 3 things that influencers promoted that wasn’t worth the hype. I was like “shut up, no its not! I seriously love them!” Seriously, I’ve had mine over a year and I’m in love! BUT, it was a learning curve to get the perfect recipe down pat and I’m giving you all of my tips below!

    First off, if you want your entire home covered in scent, you need to figure out placement. My home is 3,600 ish square feet and I have 4 units. Two downstairs on opposite sides of my home and two upstairs. One on the boys side and one in our open toy room area. The suggestion is 1 per 1000 sq feet but honestly if you wanted to put one in every room, you could. You would just set your fragrances at a lower strength!

    Secondly, when selecting your scents, you want to pick two different scent profiles! This was one mistake that I made when first starting out. I love fresh and clean scents, so I will plan for my monthly subscription to include a fresh floral such as Bridgewater Sweet Grace and Nest Grapefruit. Or, Nest Bamboo with Capri Blue Volcano. You can always swap fragrances before your subscription processes, so the selections are endless. Plus if you don’t like a fragrance, you can return it for another!

    Next up, we are going to talk about the app and why you don’t want two of the same scents in the device! The app is pretty user friendly! The app will take you through the set up step by step. My 11 & 12 yo know how to take my phone and switch out fragrances. I won’t go into detail about all of that… What I will go into detail on is the calendar/timer feature and scent intensity. I feel like this is the deal breaker on loving or hating this device!

    Let’s talk about the calendar & timer! That olfactory system of yours tends to get used to scent. Ever have someone come into your home and compliment how good your home smells, but you don’t know what they are talking about? Yeah, when you smell something for a long time, you are so used to it that you don’t register the smell anymore! This is why you must tap on your fragrance and take advantage of that little calendar tab at the bottom right! I set my first fragrance to run from 7am to 4pm and my second to run from 6pm to 12am. Remember how I mentioned about my selecting a floral and a citrus? Well, we can smell the difference when the system switches over and we notice the fresh florals when its their turn! Before when we would just let a scent run, we had a hard time smelling it after a few hours. However our friends could smell what we could not!

    Lastly, we are going to discuss scent intensity! I really believe that this and the calendar/timer holds the secret to your scent lasting all month long. If you just plug in your scent with no adjustment, it will not last you (and your nose will get used to the scent even faster). Like maybe a week if you are lucky! When I first plug in a scent, I set the intensity between a 3-4. The oils are at their strongest and a little goes a long way. As the scent wears on, I will open the app and toggle over the intensity strength as the month goes on and I notice that it is not as strong as it once was.

    I sure do hope these tips are helpful! We love our Pura system and have for over a year! I love that my home smells like my favorite candles and scents without burning a candle. My home always smells fresh despite it being filled with 4 smelly boys (5 if you count my husband) and 2 dogs.

    And as always, click here and use code MITZI15 for 15% off your purchase!

  • 5 Effortless looks for the Busy Mom

    5 Effortless looks for the Busy Mom

    Listen sis! Just because you have littles running around at your feet, kids to get to practice and supper to get on the table, doesn’t mean that you have to wear frumpy clothing. I’ve been there, and it made me feel like crud. Do I put on makeup everyday or get dressed to the nines? Nah! But I have weeded out all of my frumpy clothes and added them to a tote that is labeled paint clothes, because that is all they should be worn for! Below I have linked 5 of my favorite go-to looks for every day! Throw on some mascara, or some big sunnies and you are ready for anything the day throws your way!

    1. Pair a sleek pair of joggers with a modal bamboo top for a chic athletic look. I have linked my favorite pair that just so happened to be the perfect inspired pair that is the same quality, if not better than that name brand with a “fruit” in its name!
    2. A fun baby doll dress is a great everyday staple. This ombre one is my personal fav and I have been wearing it at least twice a week! It’s currently on clearance, so grab it while you can!
    3. As we approach warmer weather, distressed denim shorts and fun tops will be my go-to! Add fun accessories such as a hat or fun headbands to personalize your look even further!
    4. Loungewear sets. Now this one is a catch 22. I love a good comfy loungewear set, however I save my printed sets for days when I have no plans to leave. If I have errands to run, I will throw on a solid set and accessorize with some gold necklaces and my favorite stack of bracelets!
    5. Tshirt Dresses!!! I probably have this dress in every color and its under $10! I adore these! They are perfect for warm days. If I have to run out the door, I pair with a denim jacket and a hat to cover my dirty hair!
    6. Accessories! I have linked my favorite hair accessories, bracelets, inspired bags and shoes for ya.

    As moms, we are busy and sometimes we forget about ourselves sometimes. Believe me, I’ve been there! Heck, I’m still there most days! But taking the time out to put quick staples in your wardrobe that you can grab and throw on amidst the chaos. I know it makes me feel so much better to be a little put together and I hope that you feel the same!

  • Comfy Gifts for Mom

    As much as I love a night on the town, I love a comfy & cozy night in. Especially if it includes my husband distracting my boys with a night up in our movie room watching a movie or playing video games. I want all the quiet time with some comfy PJ’s, my hair tossed up in a messy bun, eye masks for my tired eyes and buried under pillows and a cozy blanket!

    This year, it has been my go to since we are home a lot more. I have linked some of my favorite products at all price points. I have these items and they are tried and true my top 8 favorites (and here’s why)!

    1. Barefoot Dreams Blanket: I have had my eye on this blanket for years! I’ve had mine for 4 months and I have to say that it is one of the softest and coziest blankets that I own. We are somewhat blanket connoisseurs in our home and this one is definitely in the top 3! I curl under this luxe blanket every time I have a spare minute to watch a little television.
    2. Jo Malone London Travel Set: This set is the perfect starter set. These scents are divine (my top favs) and the perfect trial/travel size to test it out to see if you truly love them. P.S. you will and you will become a scent layering connoisseur in no time!
    3. Jo Malone London candle: Ya’ll, this candle is so luxe! I am a candle person and this one is worth every penny. It is super scented, burns evenly, and fills any room with luxe fragrance. I have this candle in our bedroom and I love it.
    4. Satin Pillowcase and Mask Set: So I have to be honest, I don’t use a sleep mask but this set is such a great deal compared to its competitors. I will just bundle the sleep mask with a fun set and gift to our neighbor for her birthday. This satin pillowcase though… I love sleeping on a satin pillowcase simply because of it benefits. It is great for your hair and limits the amount of creasing that occurs overnight. It’s also great for your face, its great for fending off fine lines and wrinkles and it is soft and non-irritating. My mom used to actually have me sleep on a satin pillowcase when I was a girl simply to preserve my “Shirley Temple” curls and I know she is up there saying “I told you so”
    5. Pajama Set: Let me preface by saying, if you purchase anything on this list, this is the one to grab! These PJ’s are my FAV!!! Like hands down FAV! I have been in LOVE with these PJ’s for years!!! The fabric is so buttery soft, they do not pill, they wash well, and they last! I have tried some of the competitors versions that were less expensive and they are just not the same. These are money!!
    6. Satin Hair ties: Now if you know me, you know that I am a huge lover of teleties. You know those hair ties that look like an old phone cord? Well, these hair ties are tied at number 1 with those! These satin hair ties are so gentle on your hair and prevent creasing as well. I love to throw my hair up in these at night and sleep in them. Plus, they look adorable for everyday wear as well!
    7. Gold Eye masks: I have been using this brand of eye masks for a while. They are by far my favorite. Eye masks are my fav when I am feeling “mom tired” or after a night of drinks and fun. Pair this with the pillowcase set and/or the satin hair ties for a cute little gift of pampering!
    8. Soft & Plush Robe: Let me first start off by saying that when I first saw (and felt) this robe in store, I knew that I needed it. First off, it is super affordable and just as soft as the higher end brands that I have been eyeing for a while. Secondly, it is soft, like so soft… and cozy.

    So there ya have it guys, my comfy favorites. I have to say, I have and adore everything on this list and they are truly my top favorites that I would not mind having more of under my tree. Of course, what would be icing on the cake is opening these gifts and seeing a hand written voucher from my husband promising for some much needed quiet time and 4 little elves cleaning my house while I take naps and watch movie marathons! (wink, wink!)